Wednesday, March 30, 2011

iMad Scientist: Procreate iPad App Review

For the next few posts, I'll be reviewing my experiments with various iPad paint apps. I'd very much welcome comments & tips if you have experience with these apps, or any questions if you are looking into the subject yourself.

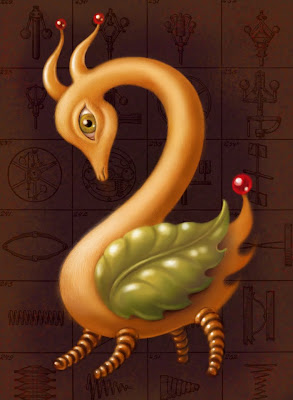
This image, "Springy" was created using Procreate with the Nomad Brush. The spring diagrams in the background are from a vintage technical book, scanned & imported into photos. (Please click for a full-size view.)

This app has some very appealing characteristics, but in its current incarnation, it doesn't quite suit my style, as I'll explain below.

Ease of Use
By the time I picked up Procreate, I'd already worked with several apps, so I'm not sure how it would strike a newbie, but it seemed fairly straightforward to me, & the developers offer a very helpful pdf user's manual to help work out any mysteries. The app works smoothly with none of the lag I've experienced with some others, & from what I've heard, user support is unparalleled.
The undo/redo depth is outstanding, allowing for 100 levels! The non-interpolated 3200% zoom is easy to use, fast, & allows great precision. This is probably my second-favorite feature of the app.

Brushes
Procreate has 8 built-in brush shapes, & is unique among paint apps (as far as I know) in allowing the user to create or import custom brush shapes & textures. This goes not only for the brush per se but also erasers & smudge tools. This is without a doubt the app's BEST FEATURE & would make it a favorite for brushes if not for one serious limitation: there is no minimum radius adjustment, so creating a tapered, precisely shaped brushstroke is all but impossible. (There is the ability to adjust radius to speed, but only to a degree, & control is iffy.) Even if you don't use tapered brushstrokes, a minimum radius feature would be extremely useful for better eraser control. There are, however, interesting adjustment possibilities for texture scale & shape rotation, as well as scatter, fall-off & spacing.

Layers
The layers palette is unusually deep for an iPad app, allowing for a luxurious 16 layers. It's fairly easy to handle when it comes to merges (down OR up), reordering, clearing, transforming & duplicating layers.
Alas, it falls short in blending effects. Only opacity can be adjusted: no multiply or screen functions here. When I work in non-digital media I use a lot of glaze effects, so when working digitally I'm a huge fan of multiply, the digital equivalent of a dark glaze. That makes this limitation the app's WORST FEATURE as far as I'm concerned. Luckily, according to the developers, future upgrades may add blending effects, & in any case, if you are an alla prima type, their absence might not bother you at all.

Color
The palette offers a large color-chooser & HSB sliders. The palette is easily accessible & the tap-hold eyedropper feature works fairly reliably, though it seems it will only sample from the active layer. {Edit: Please see my comment below.} Unfortunately there doesn't seem to be a swatch palette, so it's not possible to save favorite colors.

Imports
Procreate allows you to import multiple images from your saved photos or photo library, & to flip these (as well as your working canvas) horizontally & vertically, in addition to scaling.

Saves & Exports
Auto-saves & also makes it easy to save the file or a copy of the file at will without much fuss. You can also duplicate the file in the gallery, or export via e-mail.

Gallery
The gallery is elegant & simple in design, with large images against a dark gray ground. You can really only see one image at a time, but it's fairly easy to scroll through.

Overall
I have high hopes for this app. It's the newest on the market & the developers seem extremely responsive. I have a feeling that in the future, with a few developer tweaks, it will become a favorite. Currently, though, it's not the dream app I'd hoped for.

You can find more iMad Scientist paintings & reviews here.

Monday, March 28, 2011

iMad Scientist: SketchBook Pro iPad App Review

For the next few posts, I'll be reviewing my experiments with various iPad paint apps. I'd very much welcome comments & tips if you have experience with these apps, or any questions if you are looking into the subject yourself.

This image, "Piehole" was created using SketchBook Pro with the Nomad Brush.

Ease of Use
SP was the first App I used on my iPad, & it was a fairly intuitive learning experience for a Photoshop/Wacom user, though I certainly missed the precision & pressure-sensitivity. (See last post.)
There is some very handy in-app help, which is surprisingly lacking in many apps.
When I first started, I didn't have a stylus, which was just as well, because SP is designed to work best with fingers-- the gesture that calls up the toolbar (3-finger tap) gets a little clunky & irritating, especially if you are using a stylus. I hope future versions have an option that keeps the toolbar open-- even with fingers it would make for faster work. I also find the brush control circle in the center an annoyance, though others might find it handy.
One other issue with iPad apps in general is the danger of accidentally brushing the screen with your wrist while drawing, thus triggering unwanted behaviors. SP keeps the toolbar well out of the danger zone on the top edge, but it is still possible to create accidental marks that way. Some iPad artists use fingerless gloves to prevent this issue.
Brushes
SP has an extensive selection of brushes, though quite a few of them are gimmicky stamps that get little use from me. I'd much rather have a larger selection of erasers-- or the ability to import custom brushes, as with ProCreate. I do love the controls that allow you to set minimum & maximum radius, to create a custom-tapered effect, for eraser as well as brushes. You can also control opacity & spacing. Unfortunately there appears to be no option to save favorite brush variations. The brush toggle is handy, since it does call up the previous brush, & your variations do stay open during a work session.
Colors
The color palette is included in the brush palette, & is fairly easy to use, with a hue circle, brightness/saturation diamond, & 3 sliders, as well as swatches in an alternate palette. It would speed things up to have both swatches & sliders visible together, & it would be very much nicer if you could change colors without having to open the brush palette every time. Other apps have color icons that make changing colors frequently while using one brush a lot simpler. (When I'm done with the individual reviews I'll post a chart that shows which apps have which features.)
There is also an eyedropper tool, which can be accessed by a one-finger hold, great in theory but I find this rather erratic in practice, often causing unwanted dots of the last color. It's more reliable if you use the palette eyedropper.
Layers
You can work with up to 6 layers, & each layer has several styles available. I used normal, multiply & screen in the image shown. Probably the BEST FEATURE of SP is the ability to save & export a layered file. This means that there is much more potential to tweak the image later in Photoshop, which could be a huge advantage, especially if you intend to use the work professionally.
Importing Images/Templates
SP allows you to import images from your photos, & also provides quite a few built-in templates, such as grids, lined paper, perspective grids, dotted grids, & frames. The text & background texture of the image shown were imported from my own scans.
Saving Work
This, alas, is SP's WORST FEATURE. There is no auto-save, & when you're creating a complex layered piece, the program is prone to crashing. While painting the image above, I lost about an hour's work that way. Yes, of course I should have saved, but as I'm switching back & forth between apps right now, I forget which ones auto-save & which don't! To make matters worse, the save feature is slow & clunky, as you have to go to the gallery & reopen the sketch each time you save.
Gallery
The gallery view, where your images are saved, is fairly utilitarian with small images. Personally I prefer this style because you can see so many images at once without scrolling, but if you are looking for a fancy gallery for presentation, with frames & such, this isn't it.

Overall, I quite like this app, & if it weren't for the save/crash issue, it might be my favorite.

You can find more iMad Scientist paintings & reviews here.

Friday, March 25, 2011

iMad Scientist: iPad App Painting Experiments

Tech-phobes beware: inspired by the IF prompt "Toy" I've decided it's finally time to put aside my ink-stained Luddite ways & share my thoughts about my favorite, magical new toy/torture device: the iPad. I received it as a surprise Christmas gift, for which I'm enormously grateful because I would never have bought one for myself, & now I'm completely addicted to this brilliant little package of wonders. It's the perfect size, just like a sketchbook, easy to use on lap, desk, or cafe table (even in bed-- & no paint spills! -though I try not to do that too often). It's not feather-weight, but still relatively easy to lug around, & full of possibilities.

Of course, one of the first things I did on Christmas Day (after recovering from my swoon when I opened the package) was to download a paint app & give it a go. Now I must warn you that in some ways, painting on the iPad is an exercise in frustration, especially for precision-freaks like me, because no matter how carefully you place your finger or stylus, & no matter which app or tool you use, there is always a 5mm floob-factor of where the mark will show up. (It reminds me of learning to drive on my folk's huge & ancient station wagon, when turning the steering wheel just sort of vaguely indicated where the car might go.) Takes some getting used to if you're a perfectionist, but with practice you can still accomplish quite a lot even with this limitation. And if your natural style is loose & free, this really shouldn't be an issue at all. Sorry I even brought it up, you lucky looseys! ;)

Another major frustration is the lack of pressure sensitivity. For artists used to the wonders of Wacom & super-sensitive programs like Photoshop & Manga Studio, it's quite a leap backwards. I nurse a fond hope that Apple will someday develop an iPad tweaked for artists, with greater precision & a pressure sensitive stylus. Despite my cheapskate ways & severe mall-phobia I think I might join the crowd waiting in line for that one!

But in the meantime, I refuse to let a little frustration stop me from experimenting with new art tools & new tricks-- it's just part of the learning process, right? So I've been downloading paint apps one after the other, in search of the optimal iPad paint experience. So far, while each app has its good features (some quite amazingly good) I still haven't found that one perfect app that does everything just the way I like it. (Greedy, moi?)

By contrast, I've also done some stylus exploration, & here I've found a clear, hands-down, knock-out-the-competition favorite-- the Nomad Brush. It is surprisingly beautiful, handles like a real paintbrush, moves with a silky smooth touch on the pad surface (unlike some pen-type styli that have an irritating rubbery drag factor or require excessive pressure) & can be held at any comfortable angle (again unlike many pen-type styli). For now it only comes in one size, but I eagerly await the developers' promised size & bristle variations-- of course the inherent limitations of the iPad again come into play here, but a smaller brush might still be nice for greater stroke visibility & somewhat improved precision.

I still feel like a rank beginner at this & have been very shy of sharing my wobbly efforts, but I think the time has come to be brave. So. The image above was created with the Brushes app, using my fingers & the Nomad Brush. The background texture & text were imported from scans of non-digital stuff, saved to my iPad photos, opened by Brushes & used as the base layers. All blending, layer effects & such were done on the iPad.

Next post: I will begin sharing my experiences with all of the different paint apps I've tried, comparing features, offering tips &c. If you thought this post was tedious & long-winded, gird your loins for a real verbal onslaught, folks! But I hope it will be full of info that will help you avoid frustration & wasted money if you want to make art on the iPad.

You can find more iMad Scientist paintings & reviews here.

edit: Just found out "Toy" was added to the Nomad Brush Gallery! Thanks, Nomads!